
Manage Screened Colors in Plot Styles
Free AutoCAD Tutorials Series
There are many reasons for using screened (gray tone) colors in your AutoCAD drawings. When you need one set of objects to stand out from another set of objects in a monochrome plot, screening colors works great.
The basic idea of using screened colors is to get some feature of your drawing to have less of a visual impact by lightening it’s plotted/printed output.
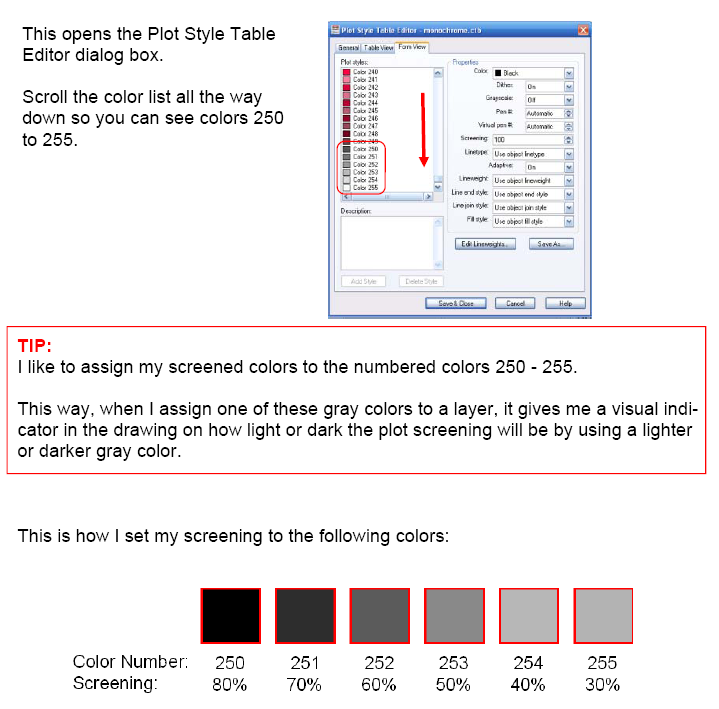
For instance, you’ve just finished an HVAC layout, and you want the HVAC layers to stand out above the floorplan layers. Giving the floorplan layers a screened setting will lighten those layers to a lighter gray color, then the HVAC layers will stand out as solid black lines above the floorplan. You control the amount of screening by giving a plotted color a screening percentage. All color settings in the plot styles are defaulted to a screening setting of 100%, which means, no screening. If you set a color to 70% screening, this gives it 70% of it’s normal darkness, or lightens it by 30%.
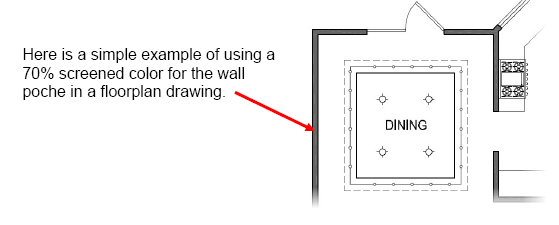
A simple example is to poche walls in floorplan drawings with a screened color. This gives the solid fill a gray color rather than solid black, and lets the wall lines still stand out.
Setting up to use screened colors is very easy using Plot Styles. There are many ways to set up and use screened colors in your projects. They range from very simple, like a one layer wall poche, to very complex with multiple layers, and multiple screened color settings.
The following tutorial is a basic introduction on how to set up for multiple screened colors at different settings for lighter to darker color screening. From here you can develop your own techniques for managing screened colors in your drawings.
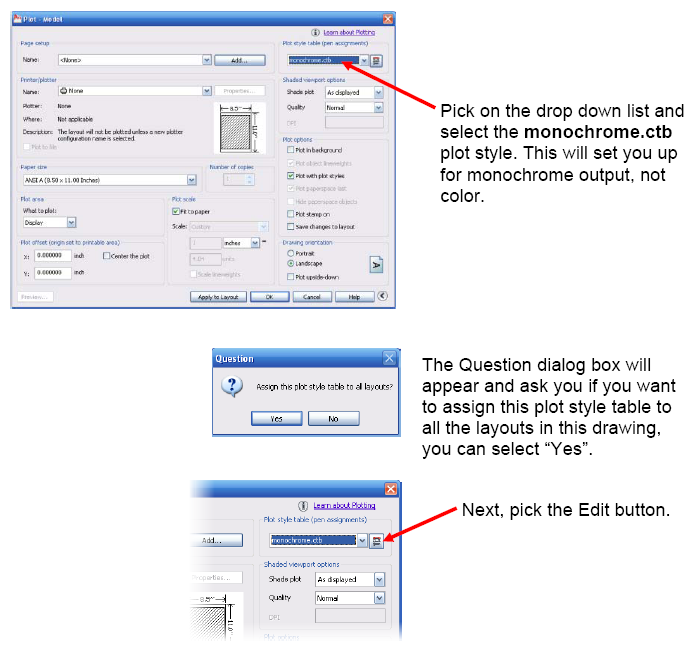
We will start by editing the monochrome.ctb plot style that comes with AutoCAD. You may want to save this plot style as a new name, which will let the original monochrome.ctb remain in it’s original condition. You can name plot styles to match up with certain design projects. That way, you can control each project’s individual plot settings with their own named plot styles.
This tutorial is using screen captures from AutoCAD 2010, your Plot Dialog box may look different if you’re using an older or a newer version of AutoCAD, but the setup is still basically the same.
Let’s begin by starting the Plot command, which will open up the Plot dialog box.
Good luck on all your projects!
Kevin McWhirter
www.ArchBlocks.com