Here are the instructions for installing the ArchBlocks Hatch Patterns for AutoCAD. The first set of instructions are for installing the AutoCAD hatch patterns in AutoCAD 2018, 2019, 2020, and 2021.These instructions are the same for AutoCAD LT 2018, 2019, 2020, and 2021. There are also instructions for installing the hatch patterns for AutoCAD R14 to 2014 below this first set of instructions.
ArchBlocks HATCH PATTERN LIBRARY
Version 2021
Installation instructions for AutoCAD® 2018, 2019, 2020, 2021 and AutoCAD LT 2018® 2019, 2020, and 2021.
Easy AutoCAD Hatch Installation Instructions AutoCAD 2018, AutoCAD 2019, AutoCAD 2020, AutoCAD 2021.
Installing Hatch patterns for use in AutoCAD has never been easier. When you purchase the CAD hatch patterns library from ArchBlocks.com you will be emailed a download link to download the ArchBlocks Hatch Patterns.zip file. A .ZIP file is a compressed file format that makes emailing large files easier and quicker. You will need to download the .ZIP file to your hard drive and then uncompress the file so that AutoCAD can access the hatch patterns.
Installation Steps:
Step 1:
Once you have purchased the ArchBlocks Hatch Patterns you will receive a download link from ArchBlocks.com. (If you don't receive the download link, just email Kevin at ArchBlocks.com and he will be glad to quickly email you the .zip file) Download the .zip file to your hard drive.
Step 2:
Uncompress the .zip file. Typically you will be asked for the location that you would like to place the uncompressed folder and files. We recommend you place the "Hatch" folder on drive " C:\ "
The folder that is created will look like this: C:\Hatch
Step 3:
Now open your AutoCAD. You will now need to tell AutoCAD where to find your new hatch patterns when you use the Hatch command in AutoCAD.
Type the command CONFIG at the command prompt. This will open the Options dialog box. (see screen capture below)
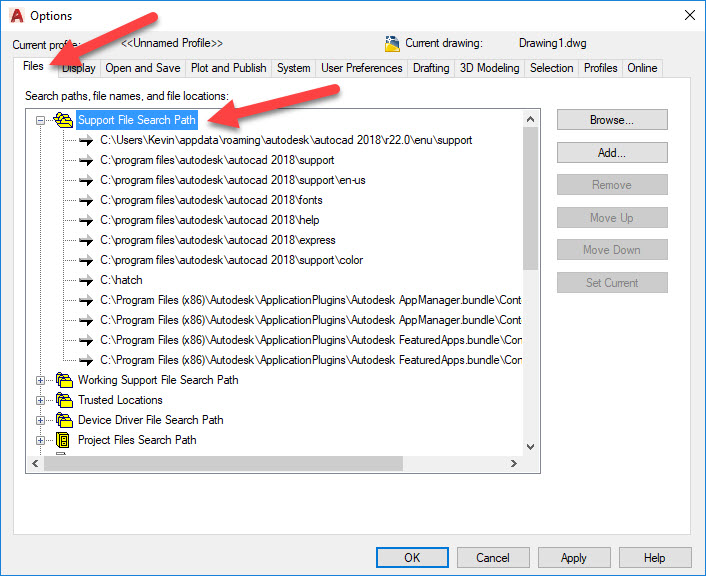
Select the " Files " tab.
Then select the " + " plus mark next to the Support File Search Path folders. This will expand the folder to show all the folder search paths that AutoCAD uses to find support files.
Next: over to the right select " Add... "
Then select: " Browse... " now browse to the new folder " C:\Hatch " and select it, then select Apply, then select Close .
Now enter the " Hatch " command at the command prompt, or select the command from ribbon bar. This will open the Hatch Creation ribbon tab with all the Hatch command options. If you select the hatch pattern preview pop down menu you can scroll down to view all the new hatch patterns previews that you just added to your hatch patterns library.
Every time you open your AutoCAD now you will have all 350+ hatch patterns available to use for your projects.
If you have any questions about installing the ArchBlocks Hatch Patterns library, please email Kevin at the link below:
Return to ArchBlocks Hatch Patterns product page:
![]()
For installation instructions on AutoCAD 2016 and old versions see below...
FOLDER and FILE DESCRIPTIONS
Hatch This folder contains all of the files necessary for use with AutoCAD, ACAD LT, and ACA.
100_v10.mnu This partial menu file contains the 100 Plus pull-down with 20 frame icon menus.
The menus display 365 of the CompugraphX 100 Plus Hatch Patterns with easy access for
selections.
Hatch.slb This slide library contains the 365 CompugraphX slides required to display the hatch
patterns. The 20 bonus hatch patterns are not included in the slide library.
Pattern Definition (.pat) Files The 385 hatch pattern files are also located within the Hatch folder.
Drawing (.dwg) Files These five drawings show all 385 patterns for reference in 8½” x 11” format.
The same five drawings are also shown in the 100PlusPatterns.pdf file for reference or printing.
The 20 bonus hatch patterns are not shown in the 100 plus menu, but are shown in the menu
supplied with the AutoCAD program.
Setup Instructions
The following instructions assume that you are familiar with the fundamental Microsoft Windows® commands and your AutoCAD program directories.
The entire Hatch folder should normally be placed in the root directory of your hard drive, typically C: drive, or in the same drive that contains your AutoCAD program files (Usually found in Local Disk C:).
Note: This folder may also be used for additional customized stand-alone hatch pattern files. This folder is placed directly in your root drive to help keep the hatch pattern description text as small as practical.
The CompugraphX hatch pattern library may be added for use with your AutoCAD 2009/2010/2011, ACA or AutoCAD LT program as follows:
Step 1 Adding the Hatch Folder to the AutoCAD Search Path
- Open AutoCAD and right click on the screen drawing area and a dialog box should appear. Optional method is to use the menu browser (“The Big Red A”) and then pick on “Tools” to display the dialog box. Users that have ACA must pick on the menu browser and pick on “Format” to display the “Tools” dialog box.
- Pick on “Options…” which is located at the bottom of the menu and then the Options dialog box will appear.
- With the “Files” tab selected, go to the top of the menu and double click on the “Support File Search Path” to show the list of AutoCAD (or ACA) folders in the search path.
- Go to the right side of the Options dialog box and click on the “Add” button. A new empty box will appear at the bottom of the list of files and folders.
- Assuming that C: is the drive that contains your AutoCAD program, type the following into the empty path box:

This entry must contain the same drive letter and file folder name used when first copying the folder to the hard drive. - After the correct text is entered in the box, click on the “Apply” button located at the bottom of the Options dialog box.
Step 2 Loading the Menu
- At the command prompt, type: MENULOAD and enter. The “Load/Unload Customizations” dialog box will appear.
- Pick the “Browse…” button. A new dialog box appears named “Select Customization File”.
- Pick the down arrow in the "Files of type:" and choose "Legacy Menu Template [*.mnu]" .
- Click on the “Look in” menu button and highlight “Local Disk (C:)” and then highlight the folder Hatch that is displayed in the window.
- Pick or highlight the 100_V10 for "File name" and click on "Open".
- The “Load/Unload Customizations” dialog box will open. With the File Name box showing “C:Hatch100_V10, click on the Load button.
- Wait a few seconds and then pick “Close”. AutoCAD will compile a new Customize User Interface (.CUI) file.
- In AutoCAD 2011, all the new hatch patterns are now loaded into the Hatch Creation palette's Pattern drop down menu. You can scroll to your named pattern as shown below;

In AutoCAD 2009 to 2015 versions the new palette menu does not show the newly loaded hatch patterns, so the pull-down menus should be used. In AutoCAD 2010 and 2009 to use the older AutoCAD version's pull-down menu bar, the MENUBAR command must be set to "1". Command: MENUBAR = 1 (0=off). The newly installed patterns can then be accessed from the “100 Plus” menu option that is located on the top menu bar and/or the menu browser. In the AutoCAD 2008 and older version the menu bar (as shown below) is the only way to access the 100 Plus Hatch patterns.

The first two drop down menu items will display the same boundary hatch menu that is available from within the "Draw" menu. The third selection (as shown above) provides CompugraphX hatch patterns displayed twenty icons at a time with a slider control. A double click on the name or the icon will invoke the hatch command and the name of the picked hatch pattern. The remaining two bars provide access to the CompugraphX geologic and soil hatch patterns. For associative boundary hatching, the patterns are accessed from the “Hatch and Gradient” dialog box. From “Type:”, pick “Custom” and pick on the solid black filled swatch or the button to the right of Custom pattern box. This will then list all of the custom patterns in alphabetical order. Highlighting a pattern name will display an AutoCAD generated graphic in the box located to the right of the slider control.
ATTENTION: In AutoCAD 2015 and all older versions, the ArchBlocks.com 11 bonus hatch patterns and the 2015 new 20 geological patterns can only be accessed through the Hatch command's Custom pattern menu as shown below;

ADDITIONAL INFORMATION
You may add additional custom hatch patterns to the Hatch folder.
There are five drawings located in the Hatch folder that show all of the 376 hatch patterns. The drawings were created with an 8 ½” x 11” format and may be printed out for reference.
USERS OF AutoCAD 2011, ACA 2011 and AutoCAD LT 2011
Hatch patterns may be applied in several different ways. Be sure to read the information supplied by Autodesk, Inc. including the “Overview of Hatch Patterns and Fills” and other related AutoCAD 2011 help files. Note that there is an option to use the “AutoCAD Classic” mode that includes the use of the “Hatch and Gradient” dialog box, etc.
HATCH ERROR MESSAGE
Hatching large areas and/or using dense patterns may cause the following AutoCAD error message to occur: "Hatch spacing too dense or dash size too small". AutoCAD 2009 through AutoCAD 2011 sets a default limit of 1,000,000 segments for hatched areas. The default MAXHATCH setting may be increased using the SETENV AutoLISP variable.
Example: At the command prompt enter the following: (setenv "MaxHatch" "5000000"). The MaxHatch variable is case sensitive for AutoCAD 2009 through 2011, so you should use an uppercase M and H. Also note that a larger number decreases the performance of AutoCAD. The maximum allowable number that may be used is 10000000. Use the trial and error method to find the preferred value for your particular case.
CREDITS AND LEGALITIES
● AutoCAD, AutoCAD LT and ACA are registered trademarks of Autodesk, Inc.
● Windows is a registered trademark of Microsoft Corporation.
● CompugraphX is a Registered Developer #223 with Autodesk, Inc.
● The 100 Plus Hatch Pattern Library is not an Autodesk product and is not warranted by Autodesk.
● 100 PLUS Hatch Patterns are registered by CompugraphX (C) 1989-2005 with the United States Copyright Office, Reg. number TX 2 832 507.
SOFTWARE LICENSE
This software is intended for use on one (1) computer/workstation only. Violation of this regulation is illegal and prohibited by copyright laws. ArchBlocks.com offers substantial discount prices for multiple copies or site licenses.
ADDENDUM
Some releases of AutoCAD do not list all the hatch pattern names in the compiled Custom list.
Seven of the hatch patterns have a tilde (~) added to the pattern name, such as LOG~.pat.
These seven patterns are exactly the same as the ones without the tilde and are provided so that they will be displayed in the Hatch Pattern Palette provided by the AutoCAD program.
ArchBlocks HATCH PATTERN LIBRARY
Installation instructions for AutoCAD® Release 14 through 2008 including ADT, ACA and AutoCAD LT®
FOLDER and FILE DESCRIPTIONS
Hatch This folder contains all of the files necessary for use with AutoCAD, ACAD LT, ADT and ACA.
100_v10.mnu This partial menu file contains the 100 Plus pull-down with 20 frame icon menus.
The menus display all of the CompugraphX 100 Plus Hatch Patterns with easy access for selections.
Hatch.slb This slide library contains the 365 CompugraphX slides required to display the hatch patterns.
Pattern Definition (.pat) Files The 365 hatch pattern files are also located within the Hatch folder.
Drawing (.dwg) Files These five drawings show all 365 patterns for easy reference in 8½” x 11” format.
Setup Instructions
The following instructions assume that you are familiar with the fundamental Microsoft Windows® commands and your AutoCAD program directories. The entire Hatch folder should normally be placed in the root directory of your hard drive, typically C: drive, or the same drive that contains your AutoCAD program files (Usually found in Local Disk C:).
Note: This folder may also be used for additional customized stand-alone hatch pattern files. This folder is placed directly in your root drive to help keep the hatch pattern description text as small as practical.
The CompugraphX hatch pattern library may be added for use with your AutoCAD or AutoCAD LT program as follows:
Step 1 Adding the Hatch Folder to the AutoCAD Search Path
Open AutoCAD and go to the top menu bar and pick on “Tools”. Users that have ADT 2004 through 2008, AutoCAD 2008 or AutoCAD LT 2008 must pick on “Format”.)
- Pick on “Options…” which is located at the bottom of the pull-down menu and the Options dialog box will appear.
- With the “Files” tab selected, go to the top of the menu and double click on the “Support File Search Path” to show the list of AutoCAD (or ADT) folders in the search path.
- Go to the right side of the Options dialog box and click on the “Add” button. A new empty box will appear at the bottom of the list of files and folders.
- Assuming that C: is the drive that contains your AutoCAD program, type the following into the empty box: C:Hatch. This entry must contain the same drive letter and file folder name used when first copying the folder to the hard drive.
- After the correct text is entered in the box, click on the “Apply” button located at the bottom of the Options dialog box.
Step 2 Loading the Menu
Note: Save and backup any custom menu or toolbar files that you may have created.
At the command prompt, type: MENULOAD and enter, or by using the top menu bar, pick “Tools”, then pick “Customize” and then pick “Menus…”. The Menu Customization or the “Load/Unload Customizations” dialog box will appear.
- Pick the Menu Groups tab and then pick the “Browse…” button. A new dialog box appears named “Select Menu File” or “Select Customization File”.
- Pick the down arrow in the "Files of type:" and choose "Menu Template [*.mnu]" or the “Legacy Menu Template (*.mnu).
- Click on the “Look in” menu button and highlight “Local Disk (C:)” and then highlight the folder Hatch that is displayed in the window.
- Pick or highlight the 100-V10 for "File name" and click on "Open".
- Pick Load and then choose "Yes" for the question, "Continue loading MNU file?". The first time that the 100-V10.MNU is accessed, AutoCAD will compile three additional files (100-V10.MNC, 100-V10.MNR and 100-V10.MNS). These three additional files will be placed in the folder that you copied into local drive C:. This is a onetime operation and will only be necessary for a new or revised menu. Note: On all versions of AutoCAD 2006 through 2008 including LT, ADT and ACA, a Customize User Interface (.CUI) file will be created instead of the three files described above.
- Pick the Menu Bar tab and pick or highlight 100-V10. Highlight “Help” (or title of choice) to pick the location for the newly added pull-down.
- Pick Insert>> and then Close. The pull-down menus may be accessed from the “100 Plus” display that is located on the top menu bar. The second item will display the same boundary hatch menu that is available from within the "Draw" menu. The third selection provides CompugraphX AEC hatch patterns displayed twenty icons at a time with a slider control. A double click on the name or the icon will invoke the hatch command and the name of the picked hatch pattern. The remaining two bars provide access to the CompugraphX geologic and soil hatch patterns. For users of AutoCAD 2006 through 2008, the pull-down menus are used mainly for viewing and name reference only. The patterns are accessed from the “Hatch and Gradient” dialog box. From “Type:”, pick “Custom” and pick on the solid black filled swatch. This will then list all of the custom patterns in alphabetical order. Highlighting a pattern name will display an AutoCAD generated graphic in the box located to the right of the slider control.
ADDITIONAL INFORMATION
You may add additional custom hatch patterns to the Hatch folder. Also, if you are using AutoCAD 2004 or other recent versions of LT or ADT, frequently used hatch patterns may be added to your tool palette.
HATCH ERROR MESSAGE
Hatching large areas and/or using dense patterns may cause the following AutoCAD error message to occur: "Hatch spacing too dense or dash size too small". AutoCAD sets a default limit of 10,000 segments for hatched areas. The default MAXHATCH setting may be increased using the SETENV AutoLISP variable.
Example: At the command prompt enter the following: (setenv "MaxHatch" "100000") . The MaxHatch variable is case sensitive for some versions so you should use an uppercase M and H. Also note that a larger number decreases the performance of AutoCAD. The maximum allowable number that may be used is 10000000. Use the trial and error method to find the preferred value for your particular case.
CREDITS AND LEGALITIES
● AutoCAD, AutoCAD LT and Autodesk Architectural Desktop are registered trademarks of Autodesk, Inc.
● Windows is a registered trademark of Microsoft Corporation.
● CompugraphX is a Registered Developer #223 with Autodesk, Inc.
● The 100 Plus Hatch Pattern Library is not an Autodesk product and is not warranted by Autodesk.
● 100 PLUS Hatch Patterns are registered by CompugraphX (C) 1989-2005 with the United States Copyright Office, Reg. number TX 2 832 507.
SOFTWARE LICENSE
This software is intended for use on one (1) computer/workstation only. Violation of this regulation is illegal and prohibited by copyright laws. CompugraphX offers substantial discount prices for multiple copies or site licenses.
ADDENDUM
Some releases of AutoCAD do not list all the hatch pattern names in the compiled Custom list.
Seven of the hatch patterns have a tilde (~) added to the pattern name, such as LOG~.pat.
These seven patterns are exactly the same as the ones without the tilde and are provided so that they will be displayed in the Hatch Pattern Palette provided by the AutoCAD program.
Return to ArchBlocks Hatch Patterns product page:
![]()