How to Create Blocks in AutoCAD
What are Blocks in AutoCAD?
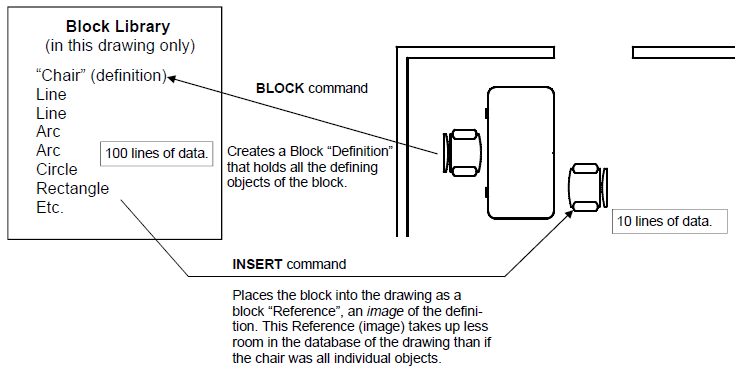
The term “Blocks” is used in AutoCAD to describe repeatable items that you place in your drawings. Also, sometimes called Symbols. So the terms “Block Library”, and “Symbol Library” basically mean the same thing in AutoCAD.
There are two main reasons why we use blocks in our AutoCAD drawings. The first reason is speed, once we draw a symbol, we will never have to draw it again. We just have to select it and drop it into our drawing so we’re working faster putting our drawings together. The second reason is file size, using blocks will greatly reduce the file size of your saved drawing, which in turn helps many of your drawing tasks go faster. It’s ALL about working FASTER!
Understanding the Block Environment in AutoCAD
Once you create an object in your drawing it can be changed into a named block. In the example below we’ll use the chair. Once it’s drawn from scratch we can block it. You use the command “BLOCK” to turn the chair into a named block.
Using Layer “0” and Blocks in AutoCAD
Layer “0” (zero) has special properties in an AutoCAD drawing when it comes to blocks. When a set of objects is on layer “0” and you block them, the new block will have a special characteristic of being able to change to the color and the linetype of any layer you place it on. Sort of like a Chameleon. Basic Rule for creating Blocks: Create all your blocks on layer “0”.
Using the Block Command.
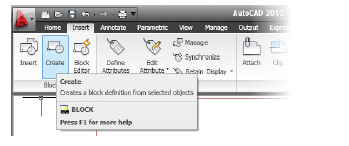
Creating Blocks in AutoCAD is very easy. First you need to draw all the parts that will make up your block. Remember, to draw all the objects on Layer “0”. When you’re ready to make your block, select the Create button in the Block section of the Insert tab on the ribbon menu.
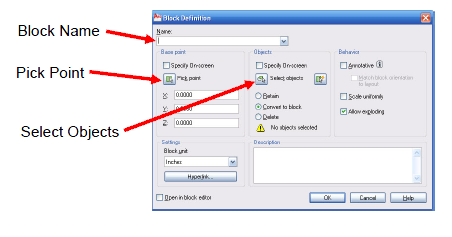
When you select the Create button, the Block Definition dialog box opens. There are 3 main steps to create the block.
- 1st Step: Type in the Name you want to give the block.
- 2nd Step: Select a Pick (base) point on the block to define it’s insertion point.
- 3rd Step: Select all the objects that you want to be included in the block.
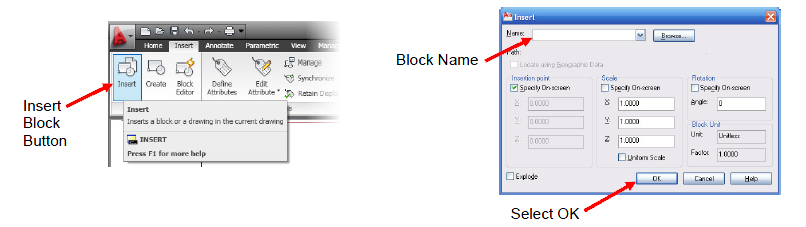
Once your block is made, it is added to the database of this drawing. When you enter the Insert command, the Insert dialog box appears. You can type in a block name, or select the pop down list to see all the blocks available in this drawing. When you’ve selected a block name, basically just select OK, and the block will appear on your crosshairs and you can pick a point in the drawing that you want to place it.
Please send me a note if you have any questions about this free AutoCAD tutorial.
Regards,
Kevin McWhirter
Contact me at: Kevin@Archblocks.com